|
|
|
|
House Rules
Tables of Organization
Vehicles and Equipment
Scenarios and Action Reports
Settings and Histories
Links
Reference Information
Articles of Interest
Gallery and Modeling
Contact and Submissions
 Background
Red Force Briefing
Blue Force Briefing
Background
Red Force Briefing
Blue Force Briefing Board Setup and Special Rules
Red Force Order of Battle
Blue Force Order of Battle
Victory ConditionsVariants
After Action Report
This scenario features a combat search and rescue team attempting to extract a downed pilot. Enemy forces in the area are trying to locate the pilot too.
It would be impossible to usefully sum up the chain of events which lead to the operations by Task Force Hannibul in the Röt Hafen area in any précis. Read the Röt Hafen Saga to get the full story that leads up to this scenario. Note, you can play this scenario without reading the background, rather treating it as a simple downed pilot rescue with no larger context. In brief: As part of human operations on Röt Hafen against the Kra'Vak, Lieutenant Michael Flug (OUDF) was shot down. Brave members of the TF Hannibal CSAR Team must attempt to recover Lt. Flug from the crash site and prevent him from falling into the hands of the Kra'Vak. The Kra'Vak are investigating a number of debris locations in the hopes of finding equipment or survivors from the downed Hu'man craft.
Mission: TF Hannibal CSAR Team One has been tasked with recovering downed pilot Lt. Michael Flug (OUDF) approx. 65 km NE of LZ Grumman (UTM Coords PJ12763298). Black box is xmitting on 234.4 and pilot is on guard channel. Local Situation: You are on CSAR duty when the call came in. Three minutes out from the LZ you lost the pilot's beacon but the crash beacon is still transmitting strongly. You are unable to reach the pilot but suspect he is still alive. The team has been set down 400 meters from the crash site as a safety precaution and you are searching the area up to the crash. There is a possibility of enemy in the area. Once you find the pilot call in for extraction. A single Raptor is available for air support.
Mission: Find friendly and enemy wreckage and pilots. Local Situation: You are part of a Kra'Vak platoon patrolling in general area. The platoon leader has other Claws and Eyes in different areas, and they will be unable to participate in this scenario. Your Claw is checking out the wreckage of several friendly and enemy aircraft that are the residue of a recent air battle. Your claw, which starts on the game board, has an order to search for enemy wreckage and survivors and report back if they find anything. The turn after anything of interest is discovered, the platoon leader and his IFV will arrive on map.
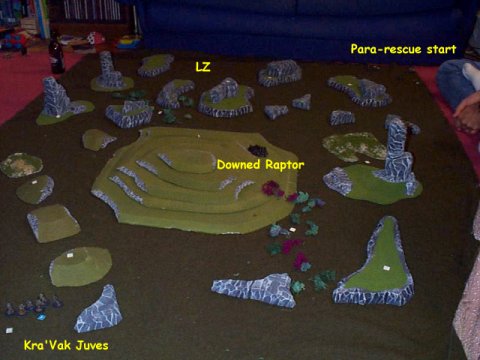
Map prep: See map below.
Terrain is rocky and hilly. The GM should place at least a dozen face down chits around the map representing various locations that the downed pilot could be hiding. All of the chits but one should be a dummy. The actual pilot location should be represented by a lettered counter. The location of the lettered counter can be random or determined intentionally by the referee if one is available. Opposing forces should enter on different sides of the map on foot. They will need to visually inspect each chit (make a successful spotting roll taking into account any die shifts for cover) to determine if the area is clear or contains something of interest. Once both sides spot each other all bets are off. The KV must call for assistance and report any human forces present. Special rules for this scenario include: Vehicles for this scenario include a Kra'Vak IFV, a human CSAR aircraft and a human ground-attack aircraft. Each has its own particular entry conditions as described hereafter. The Kra'Vak IFV containing the platoon leader and a heavy weapons claw will be allowed to enter the board (from the Kra'Vak board edge) the turn after it is summoned. It may loiter thereafter for as long as it wishes. External Air Defence Environment (ADE) is minimal. When either human aircraft is called, it must use the aircraft track and will therefore not be available for at least three turns. They may loiter upon arrival for as long as desired. The autocannons on the CSAR aircraft (which also will not appear on the game board until it is called by the players) are always considered on overwatch and may fire independently when targets enter their field of view. Grounded aircraft may be attacked with infantry weapons and are vulnerable to damage.
The Red Force includes a CSAR squad (separate squad leader and two individual CSAR fireteams), a CSAR aircraft with rapid fire autocannons manned by independent gunners, and an on-call ground-strike aircraft. These squads are High Mission Motivation and should be considered RESTED and CONFIDENT.
The target unit to be rescued (not usable until located) is a single individual pilot. The pilot is TIRED and SHAKY. The Lt. lost morale from having his bird shot out from under him and he's tired and cold and shaken up. And he's far from his element in ground combat. Altogether, this makes him very anxious to be picked up. Red Force Squad Cards here.
Blue force starts with 1 Claw on board searching on foot. When they radio in a discovery of something interesting, their platoon leader will arrive in his IFV with the Heavy Weapons Claw. Other Claws are too far away to participate. The Squads are RESTED (they haven't been searching long) and CONFIDENT. They are considered Medium Mission Motivation. Blue Force Squad Cards here.
There were never any formal victory conditions specified for this mission. I guess you could say that if the pilot is rescued and the CSAR team gets out in one piece, they've done about as well as they could. If the CSAR team is obliterated by the Kra'Vak and the pilot or CSAR personel are captured, the Kra'Vak have done about the most they could hope to achieve. Results in the area between these extremes indicate greater or lesser success for either side.
Some variants might include giving the Kra'Vak a second Claw of Juves who arrive on foot a few turns after being ordered to the battle by the platoon commander or giving the CSAR team a shorter wait time for air support. Giving the Kra'Vak a Basic ADE to give the incoming Raptor trouble would also perhaps have some effect. Another twist could be playing this with the pilot injured. He must then be carried out after being stabilized and cannot be used in the fight. This represents a rough ejection. Of course the nastiest version is an indeterminate pilot health state. When the medic checks him out, he could be fine, injured, or dead. That means the whole CSAR mission might be a pointless risk, perhaps the pilot died of his wounds before CSAR could arrive! Another variant would be setting a time limit on the CSAR search after which point the pilot will go unconcious (then a few more turns to die). This makes the search rushed for both the Kra'Vak and the CSAR squad.
This scenario was actually run by Carlos, Magic and Kr'rt as part of the larger Röt Hafen campaign. The narrative version of the AAR is here. For further details, see our Copyright and Terms of Use notice. Any questions regarding this website should be directed to the Webmaster. |
||||||||||||||||||||||||||||||||||||||